Irresistibly Crispy Mongolian Beef Stir-Fry Recipe
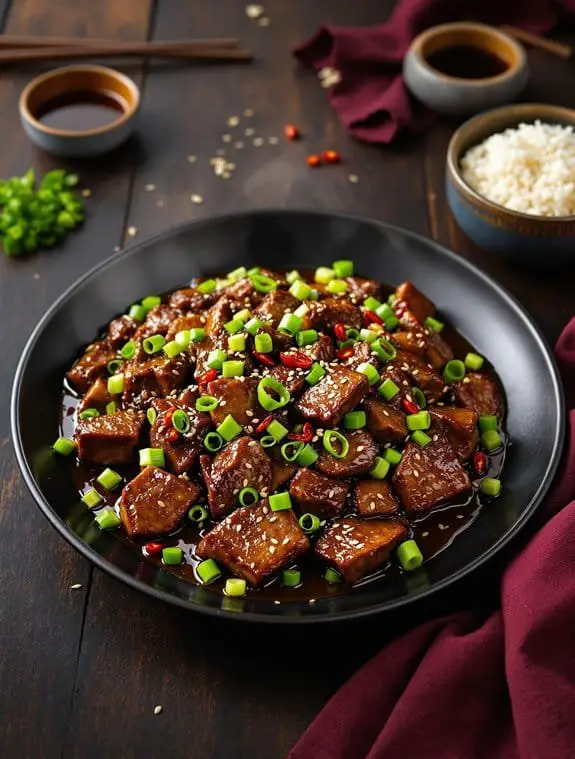
I’m about to share the secret that’ll transform your weeknight dinner game forever, and honestly, it might ruin takeout for you. This Mongolian beef isn’t just crispy – it’s shatteringly, impossibly crispy on the outside while staying tender inside, which sounds like magic but is actually just smart technique. The sauce? Sweet, savory perfection that coats every piece without making things soggy. But here’s what most recipes won’t tell you about getting that restaurant-level crunch.
Why You’ll Love this Irresistibly Crispy Mongolian Beef Stir-Fry
Every single bite of this Mongolian beef delivers that perfect contrast between crispy, golden-brown exterior and tender, juicy meat inside that’ll make you wonder why you ever bothered with takeout.
I’m talking restaurant-quality results without the hefty price tag or sketchy ingredient list.
The secret lies in that cornstarch coating and proper oil temperature. When you nail the technique, you get beef that crunches audibly, then melts into savory sweetness.
Plus, the sauce clings to every piece like it’s supposed to, not pooling sadly at the bottom of your plate.
What Ingredients are in Irresistibly Crispy Mongolian Beef Stir-Fry?
This Mongolian beef recipe keeps things invigoratingly simple with ingredients you probably already have hanging around your kitchen. We’re talking basic pantry staples and one star player, flank steak, that transforms into something absolutely magical with the right treatment.
The beauty of this dish lies in how few ingredients it takes to create such incredible flavor. No exotic shopping trips or mysterious sauces required, just smart combinations that work together to deliver that perfect balance of sweet, salty, and umami goodness.
Ingredients:
- 1 lb flank steak, thinly sliced against the grain
- 2 tsp neutral oil (vegetable, canola, or avocado)
- 2 tsp Shaoxing wine (or dry cooking sherry, optional)
- 1 tsp soy sauce (for marinade)
- 1 tbsp cornstarch (for marinade)
- 1 tbsp water (for marinade)
- 1/4 tsp baking soda
- 1/2 cup cornstarch (for coating)
- 1/4 cup light brown sugar
- 3/4 cup hot water or stock
- 1/4 cup soy sauce (for sauce)
- 1 tsp dark soy sauce (optional)
- 2/3 cup neutral oil (for frying)
Ingredient Notes and Considerations
Flank steak is your best friend here because it’s got just the right amount of chew and flavor without breaking the bank. When slicing, make sure you’re going against the grain, which basically means cutting perpendicular to those visible muscle fibers. Trust me on this one.
The cornstarch does double duty in this recipe, first tenderizing the meat in the marinade, then creating that crispy coating we’re all after. Don’t even think about skipping the baking soda either, it’s working behind the scenes to keep your beef tender while everything else gets beautifully crispy.
Shaoxing wine adds depth, but if you can’t find it, dry sherry works just fine. Dark soy sauce is totally optional but gives you that rich, caramel color that makes the dish look like it came straight from your favorite Chinese restaurant. Regular soy sauce will still taste amazing, just won’t have quite the same visual appeal.
For the frying oil, you’ll want something neutral that can handle high heat without smoking up your kitchen. Save the fancy olive oil for your salads, this job calls for the reliable workhorses like vegetable or canola oil.
How to Make this Irresistibly Crispy Mongolian Beef Stir-Fry

Making this Mongolian beef is like conducting a small orchestra in your kitchen, where timing and technique create something way more impressive than the sum of its parts. The whole process breaks down into a few key movements that’ll have you feeling like a stir-fry maestro.
Getting the Beef Ready
Start by marinating your 1 lb flank steak with 2 tsp neutral oil, 2 tsp Shaoxing wine, 1 tsp soy sauce, 1 tbsp cornstarch, 1 tbsp water, and 1/4 tsp baking soda. This isn’t just throwing ingredients together, this marinade is doing serious work. The baking soda is breaking down proteins to keep things tender, while the cornstarch starts building that coating foundation.
Let this party happen for a full hour, because good things come to those who wait. While your beef is getting pampered, you can prep everything else. This is one of those dishes where having your ducks in a row makes the difference between success and chaos.
Building the Sauce
The sauce is beautifully straightforward, which is exactly what we want when we’re about to juggle hot oil and sizzling beef. Dissolve 1/4 cup light brown sugar in 3/4 cup hot water or stock, then stir in 1/4 cup soy sauce and 1 tsp dark soy sauce if you’re using it.
The hot liquid helps that brown sugar melt completely, so you won’t end up with any gritty surprises later.
The Coating and Frying Dance
Here’s where things get fun. Take your marinated beef and dredge each piece in 1/2 cup cornstarch until it’s completely coated. Don’t be shy about this step, that cornstarch coating is what’s going to give you those crispy edges that make this dish unforgettable.
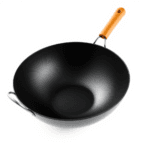
Heat 2/3 cup neutral oil in your wok until it’s shimmering and ready for action. You want it hot enough that a piece of beef sizzles immediately when it hits the oil, but not so hot that everything burns before it cooks through.
Fry the beef slices in batches, because overcrowding is the enemy of crispy. Each batch should get beautifully browned and crispy on the outside while staying tender inside.
Bringing It All Together
Once all your beef is gloriously crispy and golden, remove most of that oil, leaving just enough to coat the bottom of your wok. Pour in your sauce and watch it bubble and thicken as it heats up. This usually takes just a minute or two, but you’ll know it’s ready when it coats the back of a spoon.
Toss that crispy beef back into the wok and give everything a good stir to coat each piece with that glossy, sweet-savory sauce.
The whole final assembly happens fast, so stay focused and keep things moving. You want the beef to stay crispy while getting completely coated with that gorgeous sauce.
The magic happens in those final moments when the sauce clings to every piece of beef, creating that perfect balance of textures and flavors that makes Mongolian beef so addictive.
Irresistibly Crispy Mongolian Beef Stir-Fry Substitutions and Variations
While I absolutely love the classic version of this Mongolian beef, sometimes you need to work with what’s hiding in your fridge or cater to different dietary needs.
Can’t find flank steak? Sirloin or even chicken thighs work beautifully. I prefer keeping that against-the-grain slicing technique though.
For gluten-free folks, swap soy sauce with tamari and use potato starch instead of cornstarch. The crispy coating stays perfect.
Want more heat? Add sliced jalapeños or red pepper flakes to the sauce. Honestly, who doesn’t love a little fire?
Sweet tooth calling? Bump up that brown sugar or drizzle honey into the mix.
What to Serve with Irresistibly Crispy Mongolian Beef Stir-Fry
Perfect pairings can make or break a stir-fry dinner, and honestly, I’ve got some strong opinions about what works best with this saucy, crispy masterpiece.
Steamed jasmine rice is my go-to base. It’s neutral, fluffy, and soaks up that sweet-savory sauce like a dream. White rice works too, but jasmine’s subtle floral notes complement the beef beautifully.
For vegetables, I lean toward simple steamed broccoli or snap peas. Their crunch contrasts nicely with the tender beef. Sometimes I’ll throw together a quick cucumber salad with rice vinegar for freshness.
Want something fancier? Fried rice or chow mein noodles turn this into a complete feast.
Final Thoughts
Honestly, this Mongolian beef recipe has become my secret weapon for impressing dinner guests without breaking a sweat.
The crispy coating, that glossy sauce, the perfect balance of sweet and savory – it’s restaurant-quality food that doesn’t require a culinary degree.
What I love most is how forgiving this dish is. Beef gets a little too crispy? Still delicious.
Sauce thickens too much? Add a splash of water. It’s practically foolproof.
Trust me, once you master this technique, you’ll find yourself craving that perfect bite of tender beef wrapped in that irresistible, sticky-sweet glaze.
Irresistibly Crispy Mongolian Beef Stir-Fry Recipe


Ingredients
For the Marinade:
- 1 lb flank steak thinly sliced against the grain
- 2 tsp neutral oil vegetable, canola, or avocado
- 2 tsp Shaoxing wine or dry cooking sherry, optional
- 1 tsp soy sauce
- 1 tbsp cornstarch
- 1 tbsp water
- 1/4 tsp baking soda
For the Sauce:
- 1/4 cup light brown sugar
- 3/4 cup hot water or stock
- 1/4 cup soy sauce
- 1 tsp dark soy sauce optional
- For Coating and Frying:
- 1/2 cup cornstarch
- 2/3 cup neutral oil
Instructions
- Marinate the sliced flank steak with 2 tsp oil, Shaoxing wine, soy sauce, 1 tbsp cornstarch, water, and baking soda for 1 hour.
- Prepare the sauce by dissolving brown sugar in hot water, then stir in soy sauces until combined.
- Remove beef from marinade and dredge each piece in the remaining 1/2 cup cornstarch until evenly coated.
- Heat 2/3 cup oil in a wok over medium-high heat and fry beef slices in batches until crispy and golden brown.
- Remove excess oil from wok, leaving about 1 tablespoon.
- Add the prepared sauce to the wok and heat until thick and bubbling.
- Return the crispy beef to the wok and toss to coat evenly with the sauce before serving.
Notes
Nutrition
Frequently Asked Questions
Can I Make This Mongolian Beef Recipe Ahead of Time?
I’d recommend preparing components separately ahead of time. You can marinate the beef and mix the sauce earlier, but I’d fry and combine everything fresh since the beef loses its crispiness when stored.
How Do I Store Leftover Mongolian Beef?
I’ll store your leftover Mongolian beef in the refrigerator for up to three days in an airtight container. I recommend reheating it in a skillet to restore crispiness rather than microwaving.
What’s the Best Way to Reheat Mongolian Beef?
I’d reheat Mongolian beef in a hot skillet over medium-high heat for 2-3 minutes, stirring frequently. This restores the crispy texture better than microwaving, which makes it soggy.
Can I Freeze Cooked Mongolian Beef?
I don’t recommend freezing cooked Mongolian beef because the crispy coating becomes soggy when thawed. You’ll lose that signature texture that makes this dish special. It’s best eaten fresh or refrigerated for just two days maximum.
How Long Does Mongolian Beef Last in the Refrigerator?
I’d recommend eating your cooked Mongolian beef within three to four days when stored properly in the refrigerator. Make sure you’re keeping it in an airtight container to maintain freshness.