Spicy Homemade Chili-Garlic Sauce Recipe
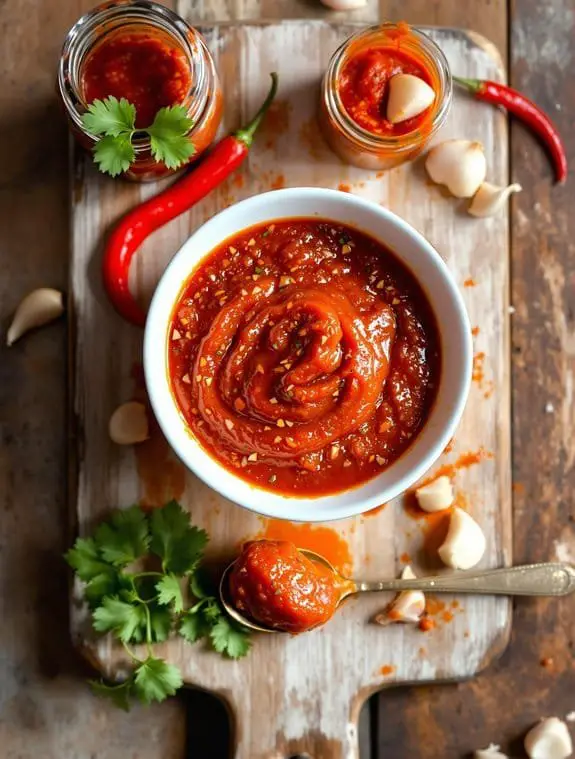
I’m about to share something that’ll completely transform your condiment game, and honestly, I can’t believe how ridiculously simple it is. This spicy chili-garlic sauce recipe uses just five basic ingredients you probably already have lurking in your pantry, yet it delivers more flavor punch than anything you’ll find in stores. The best part? You control exactly how much heat goes into every single batch, which means no more playing Russian roulette with store-bought sauces that promise “medium” but deliver nuclear.
Why You’ll Love this Spicy Homemade Chili-Garlic Sauce
When you’re tired of bland store-bought sauces that taste like corporate compromise, this homemade chili-garlic sauce becomes your ticket to flavor freedom.
You control every single ingredient, which means no mysterious preservatives or artificial nonsense cluttering up your condiment game.
This sauce brings serious heat without overwhelming your taste buds. The garlic adds depth, while vinegar provides that tangy kick that makes everything better.
Plus, you’ll save money compared to buying those tiny expensive bottles.
Want something spicier? Add more peppers. Prefer milder heat? Remove extra seeds. It’s your sauce, your rules, your delicious victory.
What Ingredients are in Spicy Homemade Chili-Garlic Sauce?
Making your own chili-garlic sauce requires surprisingly few ingredients, which is part of its beauty. You probably have most of these items sitting in your kitchen right now, just waiting to transform into something amazing.
The ingredient list stays pleasingly simple, but don’t let that fool you into thinking this sauce lacks complexity. Each component plays an essential role in building layers of flavor that’ll make your taste buds do a happy dance.
Ingredients
- 8 oz red chili peppers (red jalapeño or dried Chinese peppers work perfectly)
- 2 heads garlic, peeled
- 1 teaspoon salt
- 1 teaspoon sugar
- 1/3 cup white distilled vinegar
Choosing Your Ingredients Wisely
The peppers are your star players here, so pick them carefully. Red jalapeños bring moderate heat with fruity undertones, while dried Chinese peppers pack more serious fire. If you’re feeling adventurous, mix different pepper varieties for a more complex flavor profile.
Fresh peppers give you brighter taste, but dried ones concentrate the heat and add smokiness.
Garlic quality matters more than you might think. Those pre-peeled cloves from a jar work in a pinch, but fresh garlic heads deliver superior flavor. Two whole heads might seem excessive, but remember you’re building a sauce that needs to stand up to those bold peppers.
The vinegar acts as both flavor enhancer and natural preservative. White distilled vinegar keeps things clean and sharp, but rice vinegar works if you want something slightly milder.
Whatever you do, skip the fancy balsamic stuff here. You want acidity that complements rather than competes with your peppers and garlic.
How to Make this Spicy Homemade Chili-Garlic Sauce

Making this chili-garlic sauce feels like a small kitchen miracle, transforming a handful of simple ingredients into liquid gold. The process might seem straightforward, but a few key steps separate good sauce from great sauce.
Start with Pepper Prep
First things first, deal with those 8 oz red chili peppers. If you’re using fresh peppers, slice them open and scrape out the seeds unless you’re looking to punish yourself and anyone else who tries your sauce.
For dried peppers, soak them in warm water until they soften up, which usually takes about 15-20 minutes. The peppers should feel pliable, not crunchy. Remove the seeds from dried peppers after soaking, when they’re easier to handle.
Chop the peppers roughly once they’re prepped. You don’t need perfect knife work here since everything’s heading into the blender anyway. Think rustic, not restaurant-pretty.
The Blending Magic
Toss those chopped peppers into your blender along with 2 heads garlic, peeled, 1 teaspoon salt, and 1 teaspoon sugar. The garlic might seem like a lot, but trust the process.
Start blending and watch everything transform into a smooth, vibrant paste. You might need to stop and scrape down the sides a few times, which is totally normal. If your blender struggles, add a tiny splash of water to help things along.
Low and Slow Simmering
Transfer your beautiful pepper-garlic mixture to a saucepan, preferably one with a heavy bottom that won’t scorch your hard work.
Turn the heat to medium-low and let everything simmer gently for 15-20 minutes. This isn’t a race, so resist the urge to crank up the heat. You want slow bubbling, not volcanic eruptions that splatter sauce all over your stovetop.
During this simmering time, the flavors meld together while excess moisture evaporates. Stir occasionally to prevent sticking, and watch for that moment when the mixture darkens slightly and becomes more paste-like.
The Final Touch
Pour in that 1/3 cup white distilled vinegar, give everything a good stir, and simmer for just another minute or two. The vinegar brightens everything up while adding essential preservation power.
The mixture might bubble enthusiastically when the vinegar hits the hot sauce, which always makes me feel like a proper mad scientist.
Let the sauce cool completely before transferring it to clean jars. This cooling step matters more than you might think, since hot sauce going into containers creates condensation that can mess with your preservation efforts.
Spicy Homemade Chili-Garlic Sauce Substitutions and Variations
Every home cook eventually runs into that moment where you’re craving this chili-garlic sauce but realize you’re missing a key ingredient or want to shake things up.
No red jalapeños? I’ll grab serranos or even bell peppers for milder heat. Fresh garlic’s MIA? Granulated works, though you’ll need less punch.
Want adventure? I’m swapping white vinegar for rice vinegar‘s sweetness, or adding ginger for zing. Brown sugar instead of white creates deeper notes.
Feeling fancy? Roasted peppers bring smoky depth. Can’t handle fire? Remove seeds, add sweet peppers to the mix.
What to Serve with Spicy Homemade Chili-Garlic Sauce
Once you’ve got your perfect batch of fiery chili-garlic sauce ready to go, you’ll want to drizzle, dollop, and slather it on everything in sight.
I’m telling you, this stuff transforms ordinary meals into flavor bombs. Stir it into noodle soups, slather it on grilled meats, or mix it with mayo for an instant spicy aioli.
Dumplings practically beg for this sauce. Pizza gets a serious upgrade too.
Honestly, I keep finding new ways to use it. Scrambled eggs, roasted vegetables, even stirred into marinades. The possibilities are endless, which is dangerous for your taste buds.
Final Thoughts
While I could go on and on about the endless ways to use this sauce, the real magic happens when you start experimenting on your own.
Trust me, once you taste homemade chili-garlic sauce, you’ll wonder why you ever bought the store-bought stuff. It’s like comparing a sunset to a flashlight.
Don’t worry if your first batch isn’t perfect. Maybe you’ll add too much vinegar, or forget the sugar entirely. That’s part of the fun.
Each batch teaches you something new about your taste buds.
Soon you’ll be that person who brings mysterious little jars to dinner parties.
Chili and Garlic Sauce


Ingredients
- 8 oz red chili peppers red jalapeño or dried Chinese peppers, seeded
- 2 heads garlic peeled
- 1 teaspoon salt
- 1 teaspoon sugar
- 1/3 cup white distilled vinegar
Instructions
- Remove seeds from chili peppers and chop roughly. If using dried peppers, soak in warm water until soft, then drain.
- Add chilies, garlic, salt, and sugar to a blender or food processor.
- Process until mixture reaches a smooth consistency.
- Transfer the mixture to a medium pot and bring to a gentle simmer.
- Cook for 15-20 minutes, stirring occasionally, until mixture thickens.
- Add vinegar and simmer for an additional 2-3 minutes.
- Remove from heat and let cool completely.
- Transfer to sterilized jars or bottles and refrigerate.
Notes
Nutrition
Frequently Asked Questions
How Long Does Homemade Chili Garlic Sauce Last at Room Temperature?
I don’t recommend storing homemade chili garlic sauce at room temperature. Without proper preservation methods, it’ll spoil quickly. I’d refrigerate it immediately after cooling, where it’ll last 2-3 months safely.
Can I Freeze Chili Garlic Sauce for Longer Storage?
Yes, I can freeze chili garlic sauce for up to six months. I’ll portion it into ice cube trays or small containers for easy use. Once thawed, I’ll store it refrigerated and use within normal timeframes.
What’s the Best Way to Reduce the Heat Level Safely?
I’d reduce heat by removing all seeds completely, using milder peppers like red bell peppers mixed with hot ones, or adding more garlic and vinegar to dilute the spiciness.
Why Did My Chili Garlic Sauce Turn Brown or Dark?
Your sauce likely turned brown because I overcooked it during simmering or used oxidized peppers. I’d suggest reducing cooking time, using fresher peppers, and adding vinegar earlier to preserve color.
Can I Use This Recipe for Canning or Preserving?
I wouldn’t recommend using this recipe for canning since it’s not tested for safe acidity levels. You’d need a properly tested recipe with correct pH ratios to prevent botulism.