Sizzling Mexican Chimichanga Recipe: Crispy Golden Perfection
I’m about to share something that’ll transform your Tuesday night dinner routine into something worth texting your friends about. These crispy, golden chimichangas aren’t just another weeknight meal – they’re that perfect combination of crunchy exterior and melted, savory filling that makes you wonder why you ever bothered with regular burritos. But here’s the thing nobody tells you about making restaurant-quality chimichangas at home.
Why You’ll Love these Sizzling Mexican Chimichangas
Every single bite of these golden, crispy chimichangas delivers that perfect contrast between the crunchy exterior and the warm, savory filling inside.
I’m telling you, there’s something magical about that satisfying crunch when your fork breaks through the crispy tortilla shell.
What makes these absolutely irresistible? You get all your favorite burrito flavors, but with that addictive fried texture that’ll have you coming back for seconds.
Plus, they’re surprisingly easy to master, even if you’re a complete frying novice like I was when I first attempted these beauties.
What Ingredients are in Sizzling Mexican Chimichangas?
The beauty of chimichangas lies in their simplicity – you probably have most of these ingredients sitting in your kitchen right now. This recipe calls for basic pantry staples and fresh ingredients that come together to create something absolutely spectacular.
What I love most about this ingredient list is how forgiving it is. You can easily swap out components based on what you have on hand or your family’s preferences, making it a perfect weeknight dinner solution when you’re working with whatever’s in your fridge.
Ingredients for Sizzling Mexican Chimichangas:
- 6 burrito-size flour tortillas
- 3 cups meat mix (your choice of filling)
- Vegetable oil for frying
- Shredded lettuce
- 1 (7 ounce) can green chili salsa
- 2 tomatoes, chopped
- 1 cup guacamole
- 1/2 pint sour cream
- 6 ripe olives for garnish
Ingredient Considerations
The tortillas are absolutely essential here – you want the large, burrito-size flour ones because they need to wrap around all that delicious filling without tearing.
Don’t even think about using the small taco-size ones unless you want a frustrating assembly experience.
For the meat mix, this recipe keeps it flexible, which means you can use leftover shredded chicken, seasoned ground beef, carnitas, or even a vegetarian black bean mixture.
The key is making sure whatever you choose is well-seasoned and not too wet, or you’ll end up with soggy chimichangas.
When it comes to the oil, choose something with a high smoke point like vegetable, canola, or peanut oil.
You’ll need enough to create about half an inch depth in your skillet, so don’t underestimate how much you’ll actually need.
There’s nothing worse than starting to fry and realizing you’re running low on oil.
The toppings are where you can really make these your own.
While the recipe calls for specific amounts, feel free to adjust based on what your family loves.
Some people go heavy on the sour cream, others can’t get enough guacamole – just follow your heart.
How to Make these Sizzling Mexican Chimichangas
Making these crispy, golden chimichangas is honestly easier than you might think, and the process is actually pretty therapeutic once you get into the rhythm of it. The key is having everything prepped and ready to go before you start, because once that oil gets hot, things move pretty quickly.
Start by warming your 6 burrito-size flour tortillas in the oven for about 5 minutes. This step makes them pliable and way less likely to crack when you’re rolling them up, which trust me, is a heartbreaker when it happens.
While those are getting cozy in the oven, heat your 3 cups of meat mix in a small saucepan until it’s nice and warm throughout.
Now comes the fun part, though it requires a bit of attention. Heat about 1/2 inch of vegetable oil in a large skillet until it reaches 400 degrees F. If you don’t have a thermometer, drop a tiny piece of tortilla into the oil – it should sizzle immediately and start browning within about 30 seconds.
The assembly process is where things can get a little messy, but that’s half the charm. Take each warm tortilla and spread about 1/2 cup of your meat mix over the lower third – not the center, the lower third. This positioning is essential because it gives you enough tortilla to work with for the folding process.
Here’s where your burrito-wrapping skills come into play, except these need to be sealed up tight. Fold the bottom edge of the tortilla over the filling first, then fold both sides toward the center, and finally roll the whole thing into a neat cylinder. If your tortilla seems like it wants to unroll itself, stick a toothpick through it to keep everything in place.
The frying part is probably the most nerve-wracking if you’re not used to working with hot oil, but take it slow. Fry only 2 chimichangas at a time in that hot oil for about 2 minutes, until they turn golden brown and crispy all over.
Resist the urge to crowd the pan – they need space to cook evenly, and adding too many at once will drop the oil temperature.
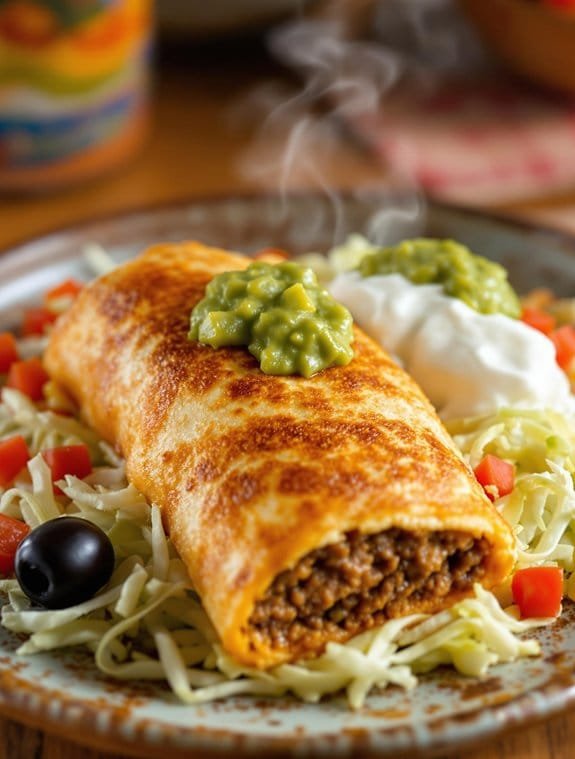
Once they’re beautifully golden, transfer them to paper towels to drain off any excess oil. The contrast between that crispy exterior and the warm, seasoned filling inside is absolutely worth the wait.
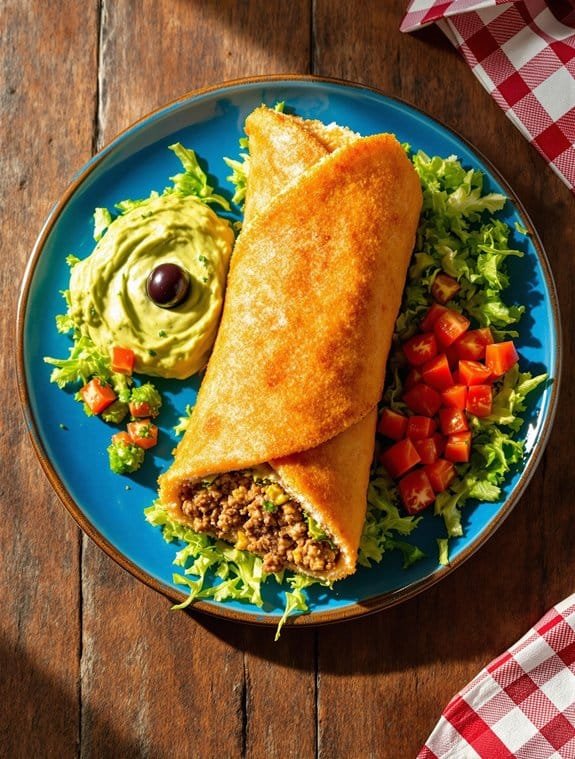
To serve these properly, create a bed of shredded lettuce on each plate, then nestle the hot chimichanga on top.
Now comes the topping parade – dollop on that green chili salsa from the 7-ounce can, scatter those 2 chopped tomatoes around, add generous spoonfuls of the 1 cup guacamole and 1/2 pint sour cream, and finish with a single ripe olive for that classic presentation.
The whole process from start to finish takes maybe 30 minutes, and most of that’s just waiting for things to heat up. Once you get the hang of the folding technique, you can probably knock out a batch of these without even thinking about it.
Sizzling Mexican Chimichangas Substitutions and Variations
While chimichangas might seem like a pretty set-in-stone recipe, there’s actually tons of room to make them your own, and honestly, some of the best versions I’ve seen come from people who weren’t afraid to mess around with the basics.
I love swapping the traditional meat mix for shredded chicken, carnitas, or even black beans for vegetarians.
Want something different? Try pulled pork with coleslaw inside, or go wild with breakfast chimichangas filled with scrambled eggs and cheese.
You can also bake these instead of frying at 425°F for fifteen minutes, though you’ll miss that signature crunch.
What to Serve with Sizzling Mexican Chimichangas
Now that you’ve got your crispy, golden chimichangas ready to go, let’s talk about what makes them sing on the plate.
I’m thinking Mexican rice with cilantro and lime – it soaks up all those delicious drippings.
Refried beans? Absolutely essential. They’re like the cozy blanket your chimichanga needs.
Add some pico de gallo for freshness, maybe some jalapeño slices if you’re feeling brave.
Don’t forget chips and extra salsa for the table.
Trust me, people will want to keep munching while they work through these beauties.
Final Thoughts
Since these crispy beauties are basically happiness wrapped in a tortilla, you’ve got yourself a real winner here.
Trust me, once you nail that perfect golden crust, there’s no going back to regular burritos.
The best part? You can prep these bad boys ahead of time and fry them when hunger strikes.
Just wrap the assembled chimichangas in plastic wrap and refrigerate until you’re ready to cook.
Whether it’s a Tuesday night dinner or weekend fiesta, these little cylinders of joy never disappoint.
Your kitchen will smell amazing, your family will be impressed.
Sizzling Mexican Chimichangas
Equipment

Ingredients
- 6 burrito-size flour tortillas
- 3 cups seasoned ground beef or whatever you have
- Vegetable oil for frying
- Shredded lettuce
- 1 7 ounce can green chili salsa
- 2 tomatoes chopped
- 1 cup guacamole
- 1/2 pint sour cream
- 6 ripe olives for garnish
Instructions
- Warm tortillas in oven for about 5 minutes.
- Heat meat mix in a small saucepan until warmed through.
- Heat 1/2 inch deep oil to 400°F (205°C) in a large skillet.
- Spread about 1/2 cup meat mix over lower third of each tortilla.
- Fold the bottom edges of each tortilla over the filling.
- Fold both sides toward the center and roll into a cylinder.
- Secure rolled tortillas with a toothpick if needed.
- Fry 2 chimichangas at a time in hot oil for about 2 minutes until golden and crisp.
- Drain on paper towels.
- Serve hot over a layer of shredded lettuce.
- Top with green chili salsa, tomatoes, guacamole, and sour cream.
- Garnish with an olive.
Notes
- Use a candy thermometer to maintain oil temperature at 400°F for peak crispiness
- Can substitute chicken, beef, or bean filling for the meat mix
- Assembled chimichangas can be wrapped in plastic wrap and refrigerated for up to 24 hours before frying
- For a healthier option, brush with oil and bake at 425°F for 15-20 minutes, turning once
- Make sure tortillas are at room temperature to prevent cracking when rolling
- Double-frying method works well: fry once for 1 minute, rest, then fry again for final crispiness
- Leftover chimichangas can be reheated in a 350°F oven for 10 minutes to restore crispiness
Nutrition
Frequently Asked Questions
Can Chimichangas Be Baked Instead of Fried for a Healthier Option?
I’d definitely recommend baking chimichangas instead of frying them. Brush them with oil, bake at 425°F for 15-20 minutes, turning once. You’ll get crispy results with much less oil.
How Long Can Leftover Chimichangas Be Stored in the Refrigerator?
I’d recommend storing your leftover chimichangas in the refrigerator for up to three days. I always wrap them tightly in foil or place them in airtight containers to maintain freshness and prevent them from drying out.
What’s the Difference Between a Chimichanga and a Regular Burrito?
I’ll explain the main difference: chimichangas are deep-fried burritos that become golden and crispy on the outside, while regular burritos stay soft since they’re not cooked after being wrapped.
Can Chimichangas Be Frozen Before or After Cooking for Meal Prep?
I’d recommend freezing chimichangas before frying for best results. Wrap them tightly after assembling, then fry directly from frozen, adding extra cooking time. Post-cooking freezing makes them soggy when reheated.
What Oil Temperature Is Best to Prevent Soggy or Burnt Chimichangas?
I maintain oil at exactly 400°F for perfect chimichangas. If it’s too hot, they’ll burn outside while staying cold inside. Too cool creates soggy, oil-soaked results that aren’t crispy.