Smoky Beer-Can Chicken Recipe: Backyard Glory

I’ll be honest with you – when I first heard about beer-can chicken, I thought it was just another grill gimmick that looked ridiculous and delivered mediocre results. But then I started thinking about the science behind it, and suddenly this quirky cooking method made perfect sense. The beer creates steam from the inside while smoke works its magic on the outside, and that upright position lets gravity do what it does best.
Why You’ll Love this Smoky Beer-Can Chicken
Envision this: you’re standing in your backyard, tongs in hand, watching two perfectly bronzed chickens perched upright on beer cans like they’re ready to strut off your grill.
This isn’t just cooking, it’s backyard theater.
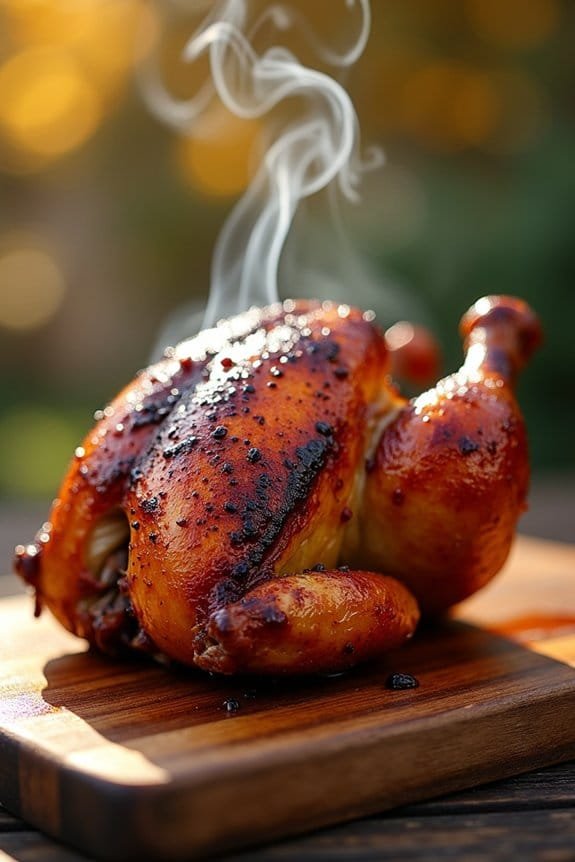
I love how the beer steams from inside, keeping the meat impossibly moist while that hickory smoke works its magic on the skin.
You’ll get crispy, golden skin that crackles when you carve it, and meat so tender it practically falls off the bone.
Plus, there’s something wonderfully ridiculous about chickens sitting upright like they’re having a beer.
What Ingredients are in Smoky Beer-Can Chicken?
This recipe calls for just a handful of simple ingredients, but each one plays a vital role in creating that perfect smoky, juicy chicken. You probably have most of these items hanging around your kitchen already, which makes this impressive-looking dish surprisingly accessible.
The beauty of beer-can chicken lies in its simplicity – you’re fundamentally using the beer as a built-in steamer while the wood chips provide that coveted smoky flavor. Don’t overthink it, because sometimes the most straightforward recipes deliver the most spectacular results.
Ingredients:
- 2 cups hickory chips or oak chips
- 2 (12-ounce) cans of beer, plus extra as needed
- 1/2 cup your favorite barbecue rub
- 2 whole chickens (3 1/2 to 4 pounds each), fat removed, washed and patted dry
Ingredient Considerations
When it comes to wood chips, hickory delivers that classic smoky bacon-like flavor, while oak provides a milder, more subtle smokiness. Both work beautifully, so go with whatever you can find or prefer.
For the beer, you don’t need anything fancy – a standard lager or pilsner works perfectly fine. The alcohol cooks off anyway, leaving behind just the malty flavors and steam. Some folks swear by using the same beer they’re drinking while grilling, which seems like solid logic to me.
Your barbecue rub choice can make or break this dish. Whether you prefer something sweet and smoky, spicy and bold, or herb-forward, pick a blend you genuinely love because it’s going inside and outside those birds. If you’re feeling adventurous, this is also where you can experiment with different liquids in the cans – cola, ginger beer, or even apple juice all bring their own unique flavors to the party.
The chickens should be relatively similar in size so they cook evenly. Look for birds that can stand upright without toppling over, because nobody wants to play chicken Jenga on a hot grill.
How to Make this Smoky Beer-Can Chicken
Getting started with beer-can chicken feels a bit like assembling an edible science experiment, but trust me, it’s way more forgiving than high school chemistry class. The first step involves soaking your 2 cups of hickory or oak chips, which requires a little advance planning but nothing too stressful.
Pop open both 12-ounce beer cans and take a church-key opener to punch 2 additional holes in each top. Pour half the beer from each can over your wood chips, then add enough extra beer or water to completely cover them. Let those chips soak for about an hour while you prep everything else, giving them time to absorb all that moisture they’ll need to create proper smoke instead of just burning up.
While the chips are doing their thing, set up your grill for indirect grilling. This means you want the heat source on one side and a cooler zone where your chickens will actually sit. If you’re using charcoal, bank your coals to one side and place a drip pan in the empty area. Gas grill users can fire up one side and leave the other side off, positioning that drip pan under where the birds will go.
Now comes the fun part that makes you feel like a barbecue wizard. Take your 1/2 cup of barbecue rub and sprinkle 1 teaspoon into the neck cavity of each chicken, then add 2 teaspoons into the main cavity. Don’t be shy about getting your hands in there and making sure the seasoning gets distributed around those cavities.
Add 1 tablespoon of the rub directly into each half-full beer can, and don’t panic when it foams up like a tiny volcano. That’s totally normal and actually kind of entertaining. Season the outside of each bird with 2 tablespoons of rub, working it into the skin with your hands until both chickens look properly seasoned.
Here’s where things get slightly ridiculous but absolutely brilliant. Stand those beer cans on your work surface, then carefully lower each chicken over a can so the can slides right up into the main cavity. Pull the legs forward to create a tripod effect with the can as the third leg. If this feels awkward, that’s because it is, but once you get the hang of it, your chickens should stand upright like they’re posing for a very strange portrait.
The trickiest part is transferring these wobbly chicken-can contraptions to the grill without everything toppling over. Move slowly and deliberately, placing them in the center of your grill over that drip pan, well away from direct heat. Toss half the drained wood chips onto each mound of coals if you’re using charcoal, or load them into your smoker box for gas grills.
Now comes the waiting game, which is simultaneously the hardest and easiest part. Barbecue those birds for about 1.5 hours, keeping your grill temperature around 350 degrees F. The chickens should turn a beautiful golden brown while the beer inside steams them from within, creating incredibly moist meat that practically falls off the bone.
If you’re using charcoal, you’ll probably need to add more coals partway through to maintain that temperature. Keep an eye on things, but resist the urge to constantly peek and poke. The internal temperature in the thickest part of the thigh should hit 165°F when they’re done.
When it’s time to remove them, transfer the whole chicken-and-can situation to a platter in the same upright position. Let them rest for a few minutes before attempting to separate the bird from the can, because that metal will be scorching hot and the chicken needs a moment to settle into its new reality.
Smoky Beer-Can Chicken Substitutions and Variations
While beer might be the classic choice for this recipe, you’re absolutely not locked into using it, and honestly, some of the most interesting flavors come from swapping out that can of brew for something completely different.
I’m particularly drawn to using cola or lemon-lime soda. The sugars caramelize beautifully, creating this glossy, almost lacquered skin that’ll make you question why you ever bothered with beer in the first place.
Root beer works magic too, adding subtle vanilla notes that pair wonderfully with hickory smoke.
Even fruit juices work, though I’d dilute them slightly to prevent burning.
What to Serve with Smoky Beer-Can Chicken
Since you’ve just pulled off this smoky masterpiece, you’ll want sides that can hold their own against all that bold, beer-kissed flavor without competing for attention.
I’m thinking creamy coleslaw cuts through the richness beautifully. Corn on the cob? Classic choice that won’t steal the spotlight.
Baked beans bring that backyard barbecue vibe, while grilled vegetables add color to your plate.
Don’t overthink it though. Simple potato salad works wonders, and crusty bread helps soak up those incredible drippings.
The chicken’s already doing the heavy lifting here, so let your sides play supporting roles in this delicious production.
Final Thoughts
Look, I’ll be honest with you – this beer-can chicken isn’t just another grilling trick that looks flashy on social media.
It’s genuinely one of the best ways to get moist, flavorful chicken every single time.
Sure, you might feel a bit silly jamming a beer can into a bird’s cavity. Your neighbors will definitely stare.
But when you’re carving into that perfectly tender meat while they’re wrestling with their dried-out chicken breasts, you’ll have the last laugh.
Trust the process, embrace the weirdness, and prepare for some seriously good eating.
Smoky Beer-Can Chicken
Equipment

Ingredients
- 2 whole chickens 3½ to 4 pounds each, fat removed, washed and patted dry
- 2 cups hickory or oak wood chips
- 2 12-ounce cans beer, plus additional as needed
- ½ cup barbecue rub your favorite blend
Instructions
- Place wood chips in a bowl and set aside.
- Pop tabs on beer cans and make 2 additional holes in each top using a church-key opener.
- Pour half the beer from each can over the wood chips. Add additional beer or water to cover chips completely.
- Soak wood chips for 1 hour, then drain.
- Set up grill for indirect grilling and preheat to 350°F.
- Sprinkle 1 teaspoon barbecue rub in neck cavity and 2 teaspoons in main cavity of each chicken.
- Add 1 tablespoon barbecue rub to each half-full beer can (foaming is normal).
- Season outside of each chicken with 2 tablespoons barbecue rub.
- Stand beer cans on work surface. Hold each chicken upright and lower over can so it goes into main cavity.
- Pull chicken legs forward to form a tripod base. Chicken should sit upright and stable.
- Carefully transfer chickens to grill center over drip pan, away from direct heat.
- Add wood chips: if using charcoal, toss half on each coal mound; if using gas, place in smoker box.
- Grill chickens for approximately 1½ hours, maintaining 350°F temperature.
- Cook until internal temperature reaches 165°F in thickest part of thigh.
- Carefully transfer birds to platter in upright position.
- Lift birds off cans to carve and discard cans.
Notes
- Soak wood chips for full hour to prevent burning and guarantee proper smoke production
- Maintain grill temperature around 350°F by replenishing charcoal as needed during cooking
- Use tongs to carefully move chickens to prevent beer cans from falling out
- Substitute beer with Coke, Sprite, or other flavored liquids for different taste profiles
- Always open cans before cooking to prevent pressure buildup and potential explosion
- Let chickens rest 5-10 minutes after cooking before carving for juicier meat
- Position drip pan under chickens to catch drippings and prevent flare-ups
Nutrition
Frequently Asked Questions
Can I Make Beer Can Chicken Without a Grill?
I can’t recommend making beer can chicken without a grill because you need indirect heat and proper ventilation. The upright position requires grill grates, and ovens don’t accommodate this cooking method safely.
What Happens if the Beer Can Tips Over During Cooking?
If your beer can tips over, I’d quickly remove the chicken from heat and reposition it upright. You’ll lose the steam effect and risk uneven cooking, so check temperatures more frequently afterward.
Is It Safe to Cook With Aluminum Beer Cans?
I understand your concern about aluminum cans. They’re generally safe for beer-can chicken since cooking temperatures stay around 350°F, well below aluminum’s melting point of 1,220°F, so you shouldn’t worry.
How Do I Know When the Chicken Is Done Cooking?
I’ll check the chicken’s doneness by inserting a meat thermometer into the thickest part of the thigh. When it reads 165°F, I know it’s safely cooked through and ready.
Can I Reuse the Beer Can After Cooking?
I don’t recommend reusing the beer can after cooking. The recipe specifically states to discard the can once you lift the bird off it, likely due to food safety and hygiene concerns.