Sticky BBQ Chicken Drumsticks Recipe
I’m about to share something that’ll transform your weeknight dinner game forever, and honestly, it’s almost embarrassing how simple it is. These sticky BBQ chicken drumsticks hit that perfect sweet spot between finger-licking good and actually manageable on a Tuesday evening. You know that glazed, caramelized coating that makes you question whether you should use a fork or just embrace the mess? Well, I’ve cracked the code on getting that restaurant-quality stickiness without the fancy equipment or culinary degree.
Why You’ll Love these Sticky BBQ Chicken Drumsticks
Nothing beats the satisfaction of biting into a perfectly glazed drumstick where the BBQ sauce clings to every ridge and curve like edible lacquer.
I’m talking about that moment when your teeth sink through the caramelized exterior into tender, juicy meat that practically falls off the bone.
These drumsticks hit different than your average chicken dinner. The spice blend creates this amazing base layer of flavor, while the multiple sauce applications build up that coveted sticky coating.
Plus, they’re ridiculously easy to make – just season, bake, and brush with sauce until they’re glistening perfection.
What Ingredients are in Sticky BBQ Chicken Drumsticks?
The beauty of this recipe lies in its simplicity – you probably have most of these ingredients hanging out in your pantry right now.
We’re talking about basic spices that work together like a well-rehearsed band, plus some good BBQ sauce to tie it all together.
The ingredient list is pleasantly short, which means less time hunting through your spice cabinet and more time getting these babies in the oven.
Sometimes the best recipes are the ones that don’t require a grocery store treasure hunt, you know.
Ingredients:
- 1 ½ pounds chicken drumsticks
- ¼ cup extra-virgin olive oil
- 1 teaspoon salt
- ½ teaspoon black pepper
- ½ teaspoon paprika
- ¼ teaspoon garlic powder
- ¼ teaspoon onion powder
- ¼ teaspoon cayenne pepper
- 1 ½ cups BBQ sauce
A Few Things Worth Mentioning About These Ingredients
The drumsticks themselves are where the magic happens. Look for pieces that are roughly the same size so they cook evenly – nobody wants some drumsticks done while others are still playing catch-up.
Fresh drumsticks work best, but if you’re starting with frozen, make sure they’re completely thawed first.
That spice blend is doing some serious heavy lifting here. The paprika gives you that gorgeous color and subtle smokiness, while the cayenne adds just enough heat to keep things interesting without setting your mouth on fire.
If you’re spice-sensitive, feel free to cut back on the cayenne or skip it entirely.
As for the BBQ sauce, this is where you can really make the recipe your own. Sweet and tangy works beautifully, but smoky or spicy varieties will take these drumsticks in completely different directions.
Just avoid anything too thin – you want a sauce that’ll actually stick to the chicken instead of sliding right off like it’s wearing a raincoat.
How to Make these Sticky BBQ Chicken Drumsticks
The process of making these sticky BBQ chicken drumsticks is invigoratingly straightforward, though there are a few key moments where paying attention really pays off. Think of it as a three-act play where each step builds on the last one.
Getting Started
First things first – preheat your oven to 400°F and line a baking sheet with foil. Trust me on the foil situation, because cleanup is going to be so much easier when you’re dealing with sticky BBQ sauce later.
While the oven’s heating up, grab a large bowl and mix together that ¼ cup of extra-virgin olive oil with all your spices: 1 teaspoon salt, ½ teaspoon black pepper, ½ teaspoon paprika, ¼ teaspoon garlic powder, ¼ teaspoon onion powder, and ¼ teaspoon cayenne pepper.
Now comes the fun part – toss those 1 ½ pounds of chicken drumsticks right into that oil and spice mixture. Get your hands in there and make sure every single drumstick is completely coated. Don’t be shy about it, because this coating is what’s going to give you that incredible flavor foundation and help create that gorgeous golden color we’re after.
The First Bake
Spread those seasoned drumsticks out on your prepared baking sheet, making sure they’re not crowding each other.
Give them some breathing room so they can cook evenly instead of steaming against each other like they’re packed into a subway car during rush hour.
Pop them into that 400°F oven for exactly 20 minutes. This initial baking time is essential because it’s when the chicken starts cooking through and that spice coating begins working its magic. You’ll start smelling something pretty amazing around the 15-minute mark, which is completely normal and might make your stomach start rumbling.
The Sauce Application Dance
After those first 20 minutes, it’s time to break out some of that 1 ½ cups of BBQ sauce.
Brush each drumstick generously with the sauce – and I mean generously, because this is where the sticky factor really starts building up.
Once they’re all sauced up, slide them back into the oven for 7 to 8 minutes.
Here’s where things get a little hands-on. Pull them out again, flip each drumstick over, and brush them with more BBQ sauce on the newly exposed side.
Back into the oven they go for another 7 to 8 minutes. This whole flipping and saucing routine might seem a bit tedious, but it’s what creates those beautiful layers of caramelized sauce that make these drumsticks so irresistible.
The Grand Finale
Now comes the moment that separates good drumsticks from absolutely incredible ones – the broiling phase.
Crank your oven to broil and give those drumsticks 3 to 4 minutes on each side, brushing with even more BBQ sauce before each broiling session.
Keep a close eye on them during this step because broilers can go from perfect to charcoal faster than you’d think possible.
You’ll know they’re done when the juices run clear and an instant-read thermometer stuck into the thickest part reads 165°F.
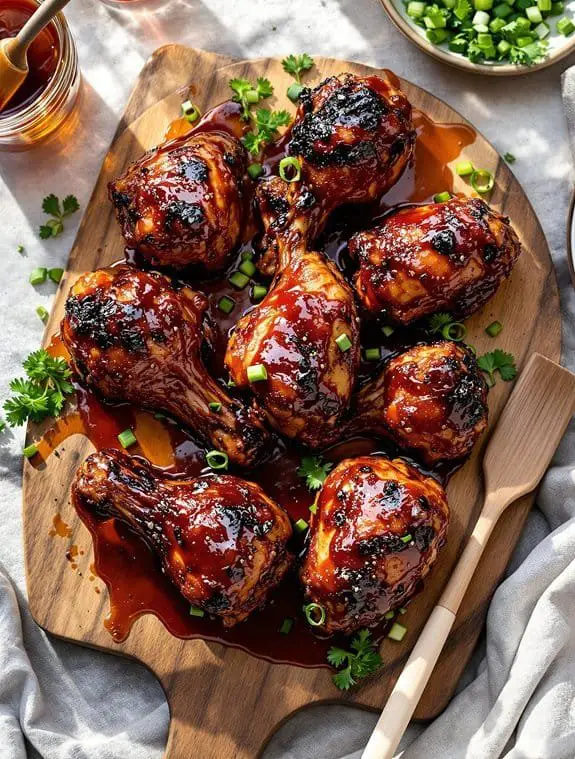
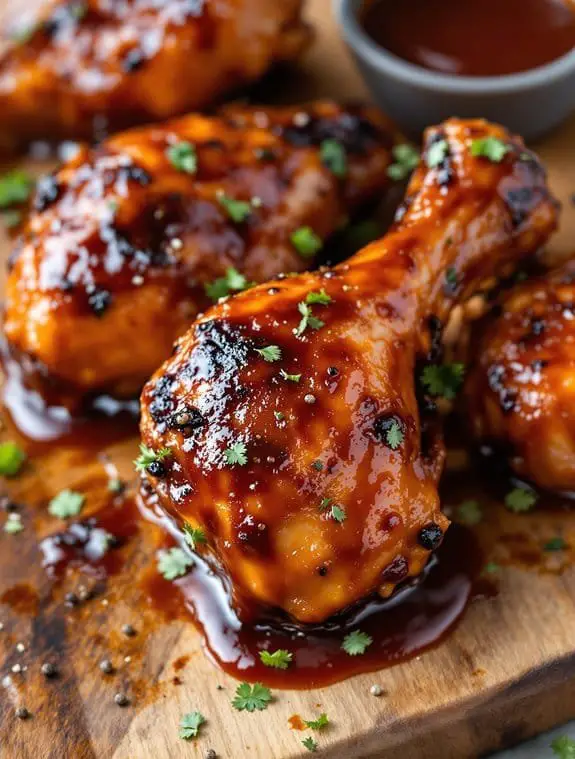
The outside should look gorgeously caramelized and sticky, like they’ve been kissed by barbecue perfection. If you want to go completely over the top, brush them with one final layer of sauce right before serving while they’re still hot enough to make that sauce sizzle slightly.
The whole process takes about 45 minutes from start to finish, but most of that time is hands-off oven work while you clean up or prep whatever sides you’re planning to serve alongside these beauties.
Sticky BBQ Chicken Drumsticks Substitutions and Variations
While this recipe delivers outstanding results exactly as written, you might find yourself standing in your kitchen staring at an empty spice rack or wondering if you can swap out that cayenne pepper because your family thinks anything spicier than ketchup is basically lava.
I swap paprika for smoked paprika when I want deeper flavor. No olive oil? Melted butter works beautifully. Skip the cayenne entirely for mild drumsticks, or double it if you’re brave.
Different BBQ sauces transform everything—tangy vinegar-based, sweet honey varieties, or spicy chipotle versions all work perfectly.
Even chicken thighs substitute wonderfully, though they’ll need slightly longer cooking time.
What to Serve with Sticky BBQ Chicken Drumsticks
What goes best with these sticky, saucy drumsticks that’ll have everyone licking their fingers?
I’m thinking classic comfort sides that won’t compete with all that BBQ goodness.
Creamy coleslaw cuts through the richness perfectly, while corn on the cob screams summer barbecue.
Mac and cheese? Always a crowd-pleaser.
For something lighter, I’d go with a simple green salad or roasted vegetables.
Don’t forget the starch – fluffy dinner rolls, buttery cornbread, or even baked beans round out the meal beautifully.
Keep napkins handy because things are about to get messy.
Final Thoughts
Honestly, I can’t think of a better way to bring people together than with a platter of these sticky, finger-licking BBQ drumsticks.
They’re proof that sometimes the messiest foods create the best memories.
What makes this recipe special? It’s foolproof. The spice rub builds flavor, while that final broiling step creates the perfect caramelized coating.
Don’t skip the thermometer check though – nobody wants rubbery chicken.
I love how these drumsticks work for any occasion, from casual weeknight dinners to backyard gatherings.
They’re kid-friendly, budget-conscious, and guaranteed crowd-pleasers.
Trust me, you’ll want napkins nearby.
Sticky BBQ Chicken Drumsticks
Equipment

Ingredients
- 1 ½ pounds chicken drumsticks
- ¼ cup extra-virgin olive oil
- 1 teaspoon salt
- ½ teaspoon black pepper
- ½ teaspoon paprika
- ¼ teaspoon garlic powder
- ¼ teaspoon onion powder
- ¼ teaspoon cayenne pepper
- 1 ½ cups BBQ sauce
Instructions
- Preheat oven to 400°F (200°C). Line a baking sheet with aluminum foil for easy cleanup.
- In a large bowl, combine olive oil, salt, black pepper, paprika, garlic powder, onion powder, and cayenne pepper. Add drumsticks and toss until evenly coated with the spice mixture.
- Arrange drumsticks on the prepared baking sheet in a single layer, guaranteeing they don’t touch.
- Bake for 20 minutes, then remove and brush with BBQ sauce. Return to oven and bake for 7-8 minutes.
- Flip drumsticks, brush with more BBQ sauce, and bake for another 7-8 minutes.
- Turn oven to broil setting. Broil drumsticks for 3-4 minutes per side, brushing with additional sauce until juices run clear and internal temperature reaches 165°F (74°C).
Notes
Nutrition
Frequently Asked Questions
Can I Make These Drumsticks on a Grill Instead of the Oven?
I’d grill them over medium heat for about 25-30 minutes, turning every 5-7 minutes. I’ll brush with BBQ sauce during the last 10 minutes to prevent burning and create that sticky glaze.
How Long Can I Store Leftover BBQ Drumsticks in the Refrigerator?
I’d store your leftover BBQ drumsticks in the refrigerator for up to three to four days. I recommend placing them in an airtight container or wrapping them tightly in aluminum foil.
Can I Use Frozen Drumsticks or Do They Need to Be Thawed?
I recommend thawing frozen drumsticks completely before cooking. They’ll cook unevenly if frozen, requiring longer baking time and potentially leaving unsafe cold spots. Thaw them overnight in your refrigerator for best results.
What’s the Best Way to Reheat Leftover BBQ Chicken Drumsticks?
I’d reheat leftover BBQ drumsticks in a 350°F oven for 15-20 minutes, covering them with foil to prevent drying. You can also microwave them for 2-3 minutes, then crisp under the broiler briefly.
Can I Marinate the Drumsticks Overnight Before Cooking for Extra Flavor?
Yes, I’d recommend marinating overnight! You can combine the olive oil and spices from step two, then coat the drumsticks and refrigerate. This’ll give you deeper flavor penetration before baking.